What is UAC and how to disable it in Windows 7, 8, 10 and Server 2012
If you want to know everything about UAC in Windows OS, then the article contains all relevant information. After reading, it will become clear what this function is for, how to turn it off, whether to do it and how to turn it on after all.
Contents
What is UAC
This function can be considered informational. It notifies the user when performing an action for which the rights of the System Administrator are required. In this case, a message appears on the screen: “Allow the next program to make changes on this computer?”. You can confirm or disable this manipulation.
What is used for
User Account Control is implemented to protect the OS from running malicious code. Thanks to him, the user is aware of important events in relation to programs: installation, removal, modification. Reverse side of the coin: not everyone will figure out what exactly UAC is requesting. Newbies this is confusing.
Why disable UAC?
It is necessary to disconnect in the event that constant requests for changes in system have bothered. This applies to inexperienced users who still find it difficult to assess the adequacy of the request each time, they will not figure it out anyway, a routine action will be performed or this virus “breaks” the OS.

In exceptional cases, Account Control is deactivated to get rid of crashes of a particular program. Under such circumstances, after troubleshooting a problem application, UAC is activated again.
Ways to disable UAC
UAC Windows 10 can be disabled in many ways, as in the seventh or eighth version. Let us analyze them separately from simple to more complex.
We use the control panel
On the example of the tenth version of Windows, everything is done as follows:
- right-click on Start, choose Control Panel in the context menu;
- in the upper part of the window that appears in the “View” block, set “Icons” and “Categories”;
- in the main part of the window, search and go to “User Accounts”;
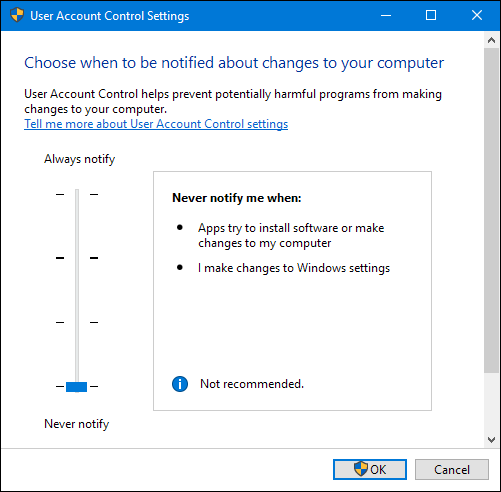
- click on the line “Change control parameters” – it is located in the lower part of the window;
- In the new window, move the slider to the lowest position and save the changes by clicking on “OK”;
- the system will ask if you need to record new settings – confirm the action.
There is a quick way to get into the necessary menu of the Control Panel. For this:
- hold Win + R;
- copy the UserAccountControlSettings command;
- confirm the launch by pressing Enter.
Result – the “Account management settings …” window opens.
How to disable the service using the command line
To disable Windows 7 UAC, use the following algorithm:
- hold Win + R combination, copy cmd command into window, start it by pressing Enter;
- copy the query to the new window: C: \ Windows \ System32 \ cmd.exe / k C: \ Windows \ System32 \ reg.exe ADD HKLM \ SOFTWARE \ Microsoft \ Windows \ CurrentVersion \ Policies \ System / v EnableLUA
/ t REG_DWORD / d 0 / f; - run it by pressing Enter;
- Restart your computer for the settings to take effect.
To enable the UAC service, perform everything as per the previously specified algorithm, but run a slightly different command: C: \ Windows \ System32 \ cmd.exe / k C: \ Windows \ System32 \ reg.exe ADD HKLM \ SOFTWARE \ Microsoft \ Windows \ CurrentVersion \ Policies \ System / v EnableLUA
/ t REG_DWORD / d 1 / f.
Disable UAC in Windows 10 through the registry
To do this, take the following steps:
- hold Win + R, enter the regedit command and press Enter – the Registry Editor will start;
- in the left pane of the Editor, follow the path HKEY_LOCAL_MACHINE => SOFTWARE => Microsoft => Windows => CurrentVersion => Policies => System;
- double click the values of the following parameters in the right pane of the Editor: PromptOnSecureDesktop, EnableLUA, ConsentPromptBehaviorAdmin, and the required new parameters are therefore: 0, 1, 0;
- after each change of the parameter, save the changes by clicking on “OK”;
- so that the settings are activated reboot the computer.
How to disable UAC for a specific program in Windows 10? There is a way for which you need to edit the registry. Bottom line – the program will run and / or change the system settings without warning from UAC, although it will not be disabled throughout the system. You need to act in the following sequence:
- In the Registry Editor, go to the following branch: HKEY_CURRENT_USER => SOFTWARE => Microsoft => Windows NT => CurrentVersion => AppCompatFlags => Layers.
- In the right part of the window, right-click on the empty space: “Create” => “String parameter”. This parameter should have a name that matches the path to the executable file. For example, for Skype it will be C: \ Program Files \ CPUID \ Skype \ Skype.exe. In each case, you need to go to the folder with the installed application and copy the contents of the address bar.
- After creating the parameter, right-click => “Edit”. A window will open and copy RunAsInvoker to the “Value” line, save the changes by clicking on “OK”. Now UAC will not bother opening this app.
If you need to disable Control for multiple applications, the procedure can be simplified. For this:
- create a text document;
- Copy Windows Registry Editor Version 5.00 into it [HKEY_CURRENT_USER \ SOFTWARE \ Microsoft \ Windows NT \ CurrentVersion \ AppCompatFlags \ Layers]“C: \\ Program Files \\ Skype \\ Skype.exe” = “RUNASINVOKER”
- in this example, replace C: \\ Program Files \\ Skype \\ Skype.exe with the path to the executable file for which UAC is disabled;
- note that double oblique lines are used;
- change the file extension to .reg;
- Double click on this file and confirm the changes by clicking on “Yes”.
Disable UAC in Windows 10 using third-party utilities
UAC Tweak utility will do. Run it after downloading and installing. If an error occurs, go to the properties of the executable file and activate the compatibility mode with Windows Vista. After starting UAC Tweak, a window will appear similar to the User Account Control settings in the Control Panel, but in a more concise form. It is only necessary to put a mark in front of the bottom line.
Ways to shut down
For less common versions of Windows OS, you can completely disable Control using a similar algorithm as for more popular Windows.
Windows Server 2012
To disable Windows in Windows Server 2012 UAC, do the following:
- Go to the “Control Panel”, “Accounts …”, “Change settings …”.
- In the new window, click on “Enable or disable …” => “Continue.”
- Uncheck “Use control credentials …”, save the changes by clicking on “OK”.
- The system will request a reboot. If you now need to deactivate UAC, then select “Restart Later.”
Windows vista
- Hold down the combination of Windows + R, type in the msconfig window, start by pressing Enter.
- In the window that appears, go to the “Service” tab.
- In the list, find the item “Disable User Account Control …”.
Why you should not completely turn off the protection
Because it will reduce the level of user control over the stability of the OS to malware. If the virus “wants” to change the system settings, then with the disabled UAC, the user will not know that such a request has been received – it will actually be executed imperceptibly.
How to remove existing updates in the top ten?
It happens that when UAC is disabled, OS updates are installed that cause system instability. You can eliminate this by deleting them as follows:
- Hold Win + I and go to the Update and Security menu.
- In the new window, follow the path: “Windows Update” => “Update Log” => “Delete Updates”.
- A list of installed updates is displayed. Highlight the desired and click “Delete” above. If you need to select and clear all – hold down the key combination Ctrl + A.
Cleaning up old files after Windows update
- Enter the query “Disk Cleanup” in the system search and run the corresponding utility.
- In the new window, specify the local disk where the OS is installed.
- Click on “Clear System Files”.
- Specify the CD with Windows again.
- Check the box next to the line “Previous installation of Windows.”
- Start the process by clicking on “OK” at the bottom of the window.
Enabling and configuring HPUS in Windows 10
The easiest way to enable UAC is via Control Panel. You need to get to the “Account Management Options …” window and raise the slider from the lowest level. Detailed instructions for opening the corresponding window are in this block of the article. Let us examine in more detail the parameters that are set using the slider in the window from the lowest to the top:
- Control is completely disabled. No notification of the request to take action with Administrator rights will not occur.
- A notification appears, but the screen does not darken. UAC is turned on and when it is triggered, an informational message appears requesting action, but the working area of the display is not blocked.
- A notification appears, the screen is dimmed.
- Notifications occur not only when changing system settings, but also when performing actions by any installer.
Conclusion
- UAC is not an antivirus, but it helps protect the OS from malware.
- Do not turn off the option without direct necessity.
- If UAC interferes only when working in a particular program, then disable the function only for this application.
- If Control is deactivated throughout the system, then after performing the actions for which everything was started, activate the system component again.