Secure Boot: how to disable protection or configure correctly in UEFI
Computer viruses have become an integral part of our lives. Even people who have never used computers have heard of them. To improve protection against malicious software, Secure Boot protocol was implemented. About what it is eaten with and how to turn it off will be described in detail in the article.
Computer viruses have become an integral part of our lives. Even people who have never used computers have heard of them. To improve protection against malicious software, Secure Boot protocol was implemented. About what it is eaten with and how to turn it off will be described in detail in the article.
Contents
What is Secure Boot and when can I disable it?
Secure Boot – one of the innovations introduced in the introduction of UEFI. This in turn is a BIOS receiver. He is accordingly responsible for the preparation and loading of the OS. The BIOS can be considered a very simple utility with a primitive design that is stitched into the motherboard. UEFI performs the same functions, but this is already a very beautiful and advanced program. For example, if you persist using UEFI, you can even view the contents of the connected drives, which would be considered an incredible innovation for the BIOS.
Not only aesthetic motives guided the creators of UEFI. One of the important goals in the development was to detect and limit the impact of malware. It was assumed that the technology will prevent its loading along with the operating system (OS), as well as execution at the kernel level of the OS after its launch. The honor to perform this important mission fell on the Secure Boot protocol. The technical implementation was as follows: a cryptographic scheme with open and closed signatures (electronic digital signatures, EDS) was used. In general, the goals were achieved, but in practice this required certain and correct actions not only from users, but also from manufacturers of computer equipment. The description of the whole process will take a lot of time, so let’s focus on the key features:
- software components (drivers, OS loaders) have special EDS, they are also in the firmware of the motherboard, but the characteristics of these EDS is different;
- when using computer resources, components must prove by means of EDS that they are not viruses;
- The key security factor is the private key, which ideally should be unique for each PC.
Difficulties with technology began at the implementation stage, when Microsoft announced that it would restrict the installation of other operating systems to computers with Windows using a protocol. Then such plans were refused under the onslaught of the public, but the sediment remained. Today, the main difficulty lies in the fact that motherboard manufacturers use the same private keys for all their products or for individual lines. In any case, good intentions led to a dead end.
In the overwhelming majority of cases, disabling Secure Boot is worth solving two problems:
- If not installed or not loading the OS.
- If you can not boot from the boot drive.
Secure Boot by itself does not in any way load the system, since it runs at a lower software level. Disabling the protocol will definitely not improve the responsiveness of the system and will not increase the speed of the processor.
How to disable Secure Boot protection in BIOS?
Note that some users mistakenly think that the Secure Boot protocol is disabled in the BIOS. This rather primitive firmware does not exist, was not available, and there cannot be support for SekyurBut. This security protocol works exclusively on UEFI and you need to disable it there. The nature of this error is quite simple. For many years, users are accustomed to, that all that occurs on the screen before loading the OS this is BIOS. In fact, the times of this software add-in go away and it is already outdated in any respect.
Examples of disabling Secure Boot on different laptops and motherboards
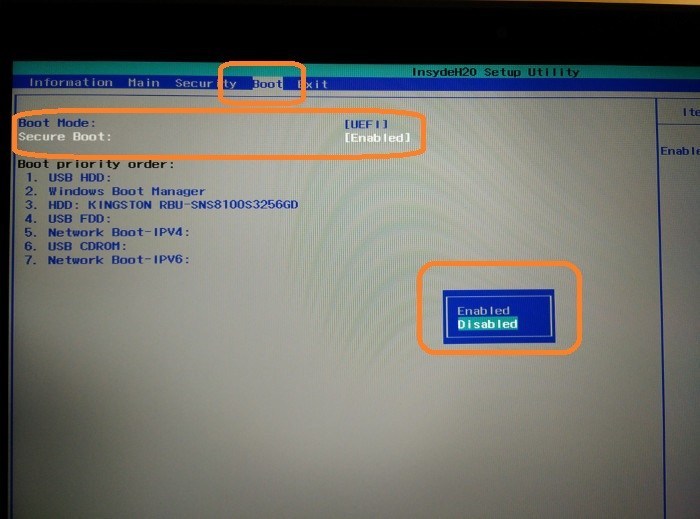
The overall algorithm is always the same:
- Login to UEFI.
- Search for the desired option.
- Disable SecureBoot.
- Record changes.
It is important that this security protocol is supported only in Windows 8 and later versions. Therefore, if Secure Boot is enabled in your motherboard firmware, but Windows 7 is installed on your PC, then you do not need to disconnect anything. The safe boot option still does not work, and possible problems with the launch of the OS should be found elsewhere.
How to disable Secure Boot and UEFI on Acer Aspire laptop?
There are many models of laptops from this manufacturer, but the specificity is such that you first need to create your own password. The general algorithm of action is as follows:
- enter BIOS-UEFI by pressing F2 or Delete;
- go to the “Security” tab, select the “Set Supervisor Password” option;
- In the special window, enter the password 2 times. Do not excel, use a simple combination;
- success will be confirmed by the message “Changes have been saved”;
- go to the tab “Boot” and in the line “Boot Mode” specify the value “Legacy”;
- press F10 and record settings;
- during subsequent overload, log in to UEFI again;
- go to the “Security” tab, select the “Set Supervisor Password” option, enter the previously specified password;
- go to the tab “Boot” and in the line “Secure Boot” specify the value “Disabled”;
- save changes again.
Disabling Secure Boot on Pavilion laptops and other HP models?
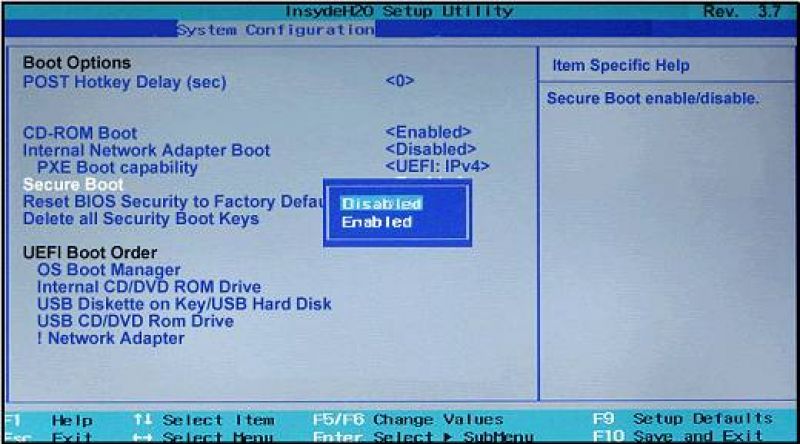
- To enter the BIOS, press ESC or ESC => F10 before running Windows.
- Go to the tab “System Configuration”, and in it find the line “Boot Options”.
- Set the “Disabled” option for the “Secure Boot” criterion and “Enabled” for the “Legacy support” criterion.
- The system will ask if you are really ready to change the settings – confirm this by clicking on “Yes”.
- At the end, you need to save the changes you made by pressing F10 and confirming “Yes”.
When rebooting, be careful. The system will be reinsured and will include “protection against the fool.” It is necessary to look at what is after the inscription “Operating System Boot Mode Change (021)” – there will be indicated the digital sequence. Type it in and press Enter. If you just need to disable Secure Boot, then nothing else needs to be done. If initially everything was done to be able to boot from a USB-carrier, then immediately after passing the “protection against a fool”, press ESC, and then F9. Set the required flash drive maximum priority so that it is loaded first on the hard disk.
On Dell laptops
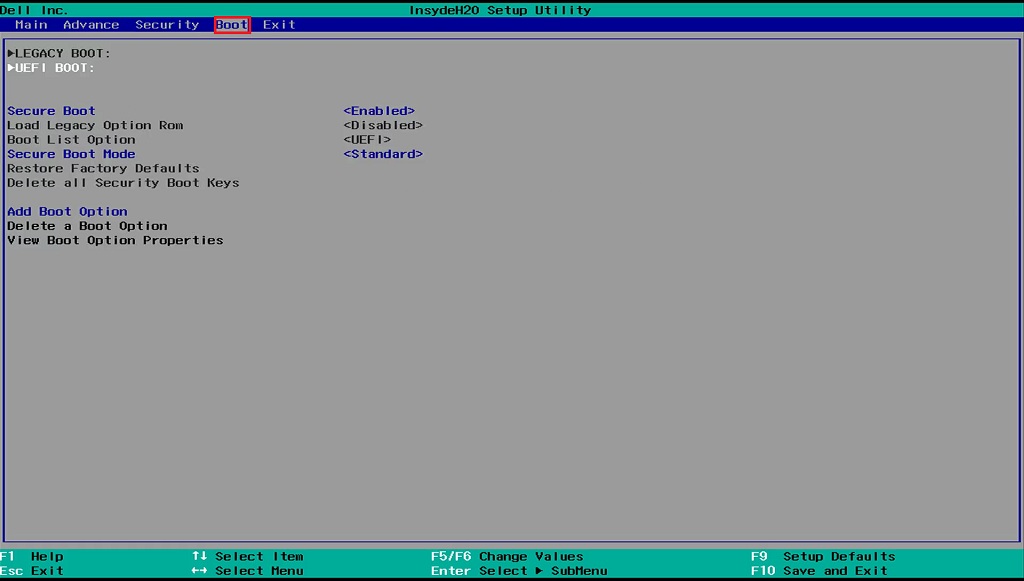
- F12 immediately after turning on the computer and before starting the OS.
- In the top panel, go to the Boot tab and go to the UEFI BOOT subsection.
- Set the criterion “Secure Boot” option “Disabled”.
- Save the changes (F10 => “Yes”) and restart the laptop.
Secure Boot on Lenovo and Toshiba laptops
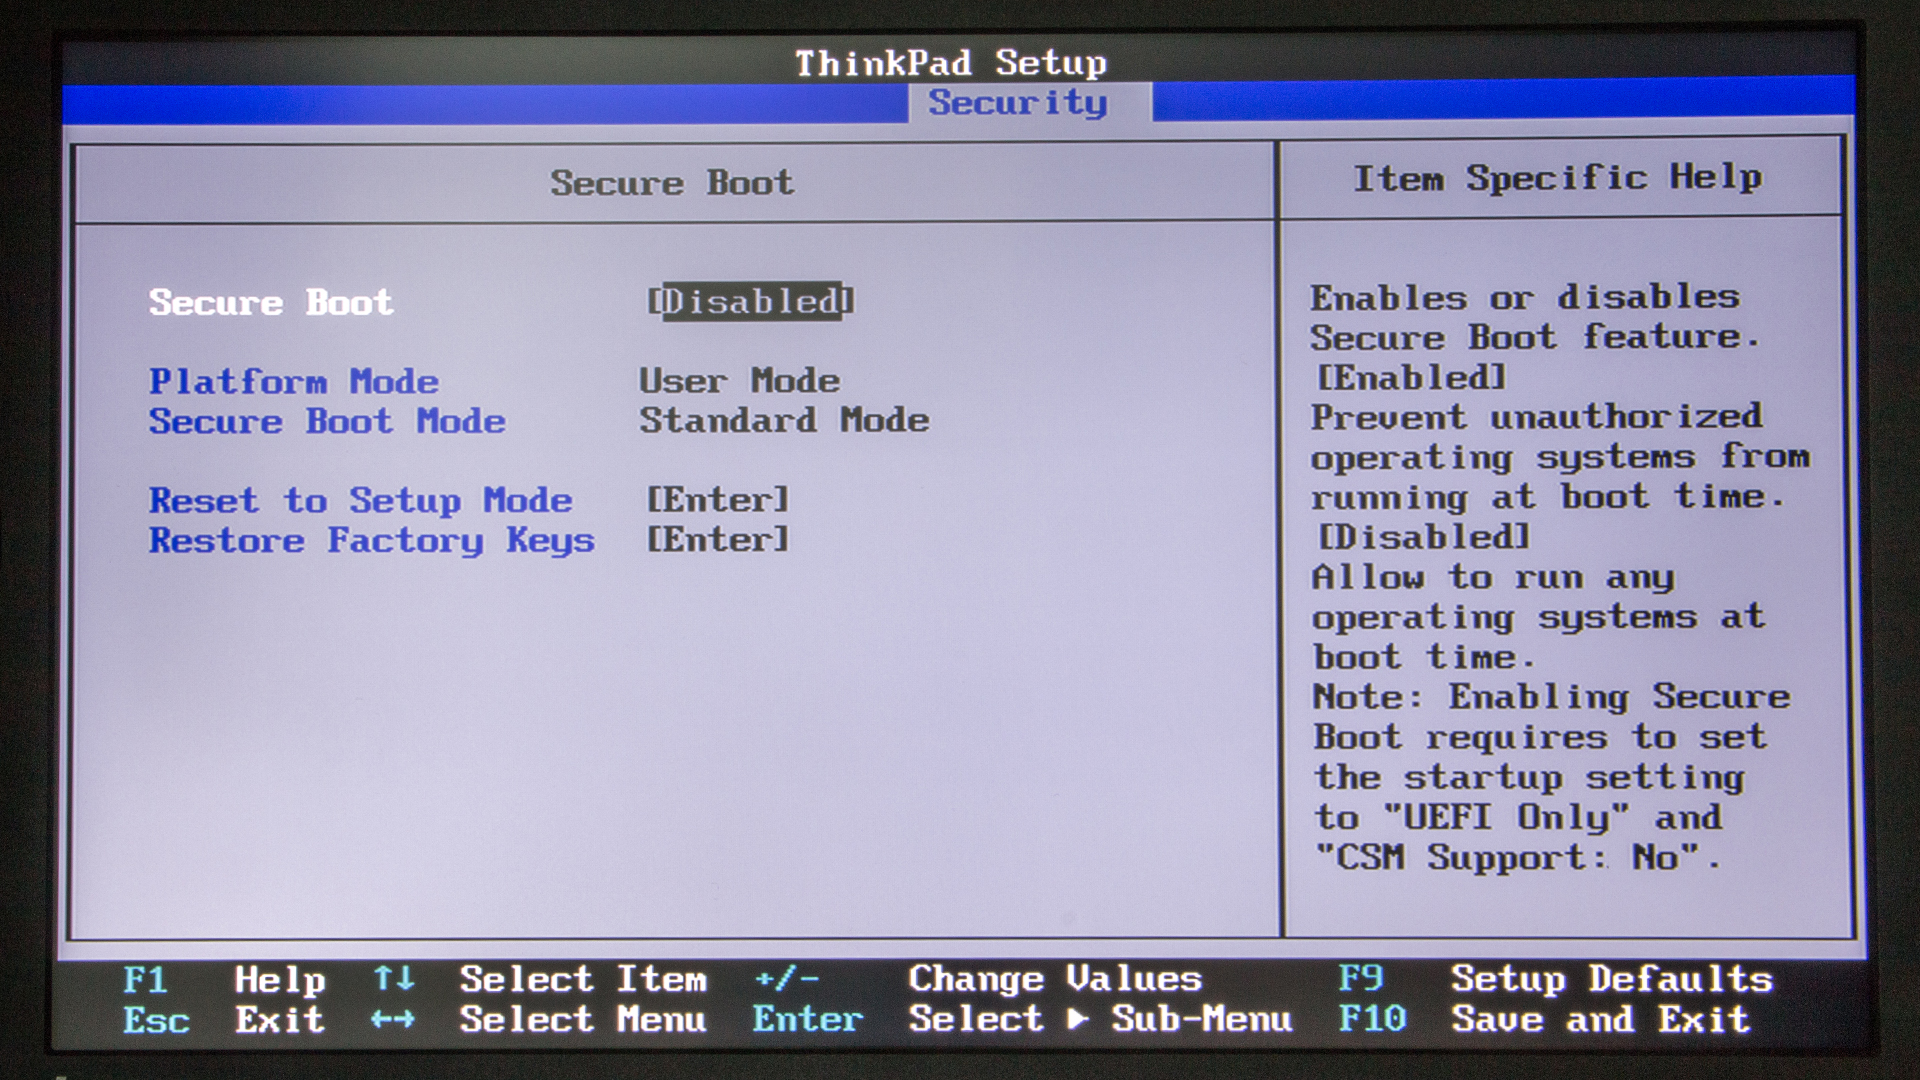
To enter the UEFI on these devices, you need to press F12, then perform the following actions:
- go to the “Security” tab;
- set the criterion “Secure Boot” option “Disabled”;
- go to the tab “Advanced”, and in it go to the menu “System Configuration”;
- set the option “Boot Mode (OS Mode Selection)” option “CSM Boot (CMS OS), (UEFI and Legacy OS)”;
- save all by pressing F10 => “Yes”.
Disable Secure Boot on Motherboards
The market of motherboards for desktop computers is quite conservative and the clear leaders are 2 companies: Asus and Gigabyte. They supply more than half of all equipment, so it’s more rational to consider ways to deactivate Secure Boot precisely in terms of these manufacturers. In any case, the third and fourth place was occupied by MSI and ASRock long ago, – the first four are entirely composed of companies in Taiwan. The bottom line: there will still be no fundamental differences in the instructions for disconnecting and most of the users will find below exactly what they are looking for.
Note that you can go directly to UEFI in some cases directly from Windows (from version 8 and later). To do this, try the following:
- On the desktop on the right, call the drawer.
- Follow the path: “Parameters” => “Change parameters …” => “Update and …” => “Restore”;
- In the resulting window, find the system reboot option and set this line to “UEFI Settings” or “UEFI Firmware Parameters”;
- After clicking on the “Restart” and in the future should automatically start UEFI.
How to disable Secure Boot on a Gigabyte motherboard?
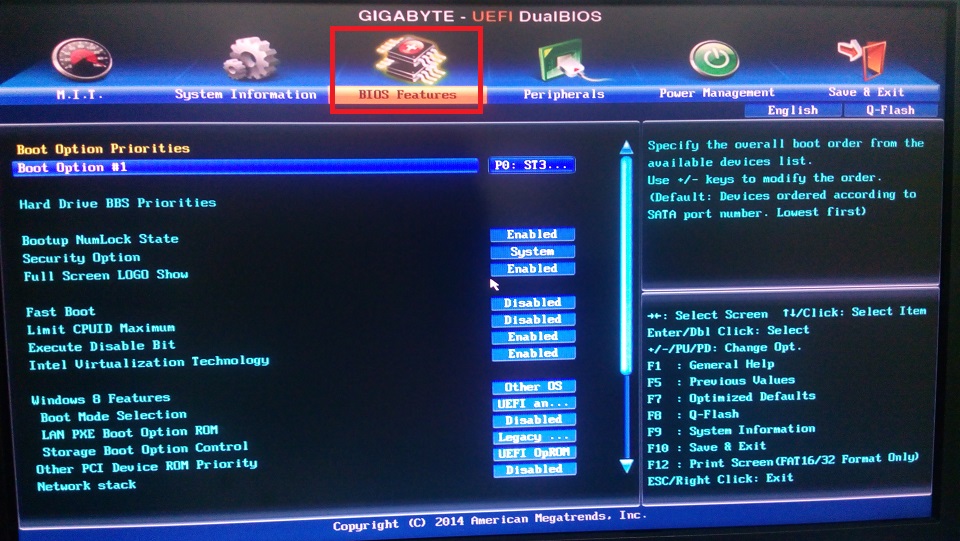
After logging in to UEFI (by pressing F12 before starting the OS), proceed as follows:
- go to the “BIOS Features” tab;
- set the criterion “Windows 8 Features” option “Other OS”;
- for the “Boot Mode Selection” criterion – “Legacy only” or “UEFI and Legacy” (there is not much difference between them);
- for the criterion “Other PCI Device ROM Priority” – “Legacy OpROM”.
After all, you need to record changes, that is, press F10 => “OK”.
Asus motherboards and laptops
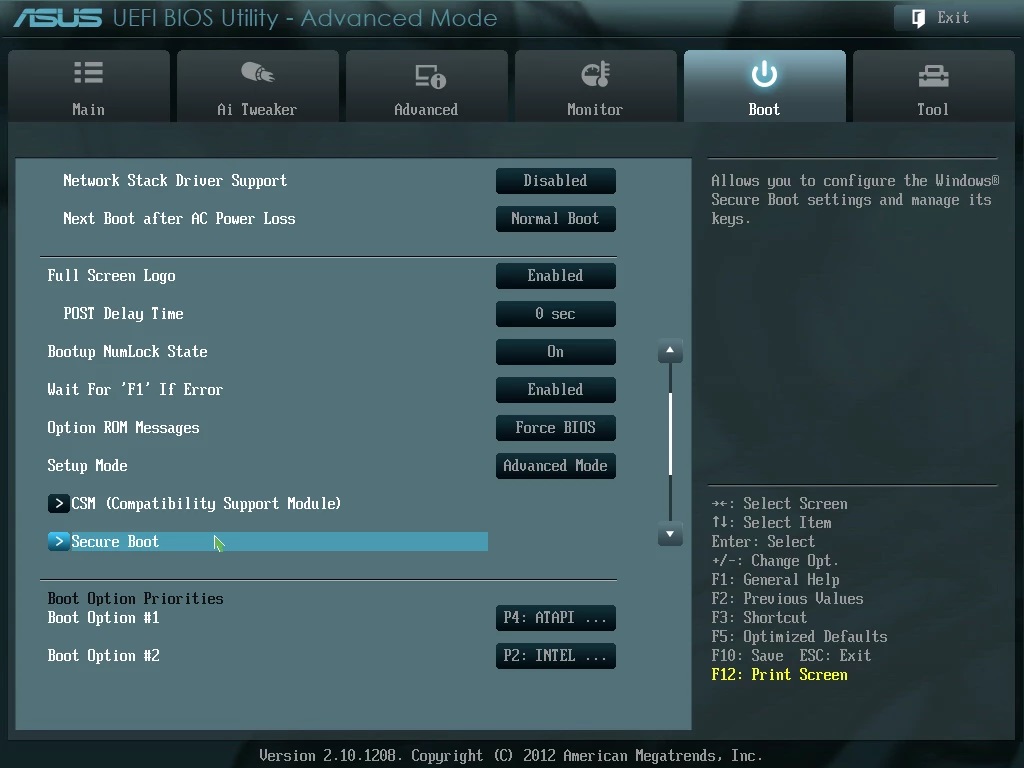
Immediately, we note that most often on the motherboard of this particular manufacturer, an error occurs when loading the OS: Invalid signature detected. Check Secure Boot Policy in Setup. In most cases, to fix the problem, you should turn off Secure Boot, and for this you need to:
- enter UEFI – press before loading the OS on F2, Delete or the key combination Fn + F2;
- On the initial screen, click on F7 (Advanced Mode), and then go to the menu “Boot” => “Secure Boot Menu”;
- Set the line “Secure Boot State” to “Enabled”, and in the line “OS Type” – “Other OS”;
- Go back one level to the menu “Boot” => “Compatibility Support Module (CSM)”;
- set the line “Launch CSM” to “Enabled”, and the line “Boot Device Control” – “UEFI and Legacy …” or “Legacy OpROM …”, and in the line “Boot From Storage Devices” – “Both Legacy opROM first” , or “Legacy opROM first”;
- then click on F10 and save all changes, and then check the correctness of the settings made.
Specifically for Asus laptops, the algorithm will be as follows:
- go to UEFI;
- go to the “Security” tab;
- find the line “Secure Boot Control”, set the value “Disabled” in it;
- go to the “Boot” tab;
- find the line “Fast Boot”, set it to “Disabled”, and in the line “Launch CSM” to “Enabled”.
How to find out if Secure Boot is activated on Windows?
This protocol is easy to activate and deactivate, and there are several proven approaches to understand the current status:
- Using system information. Run the Run utility. To do this, you need to hold down the key combination Win + R, in the appeared line type msinfo32 and press Enter. A new window will appear. Make sure that the System Information line is selected in its left pane. In the right pane, look for the line “Secure Boot Status”, which has only 2 values ”Enable” and “Disable”.
- Using PowerShell. In the Run utility, run the powershell command. A new window will open in which to copy the following: Confirm-SecureBootUEFI. If this request returns the answer “True”, then the option is active, and if “False”, then deactivated. If a notification of a different nature appears, it means that the motherboard does not support the Secure Boot function.
- Empirically. Create a bootable USB flash drive with Windows and try to boot from it after rebooting the computer. If everything is successful, then the option is turned off, otherwise the corresponding message will appear on the impossibility of loading for security reasons.
Conclusion
- Secure Boot appeared in the computer world relatively recently and this security protocol is part of UEFI – a modern and relevant type of motherboard firmware.
- The security protocol prevents malware from running at a lower level than conventional antiviruses do. Therefore, if properly configured, this technology can significantly increase the resistance of the PC to viruses.
- Secure Boot should be disabled as needed if it prevents the system from starting from a bootable USB flash drive or when reinstalling Windows. Just for the experiment, the technology should not be deactivated.
- For any computer, the deactivation scheme is the same – by specifying the appropriate criteria in the desired UEFI menu. The main thing is to find the right path to such a menu. Even with significant difficulties it will take no more than 10 minutes.